
Here you get detailed information about GST Registration, Why GST Registration required, Benefits of GST registration and other details.
WHAT is GST Registration?
Registration under any taxation system is necessary for identification of tax payer ensuring tax compliance in the economy.
Under GST Law, a person is required to get registered as a “normal taxable person”
if their business turnover exceeds limit of Rs.40/20/10 Lakhs (different in state to state).
Further in some cases, GST registration is compulsory.
Without registration a person can neither collect (charge) tax on sales nor can claim input tax credit (ITC) on purchases or input services.
The Registration Process usually gets completed within a week and the same can be done online at GST Portal
Why GST registration is required
Any Person who is a supplier carrying on any business in India and whose aggregate turnover exceeds the prescribed threshold limit of Rs. 40/20/10 lakhs in a year is liable to get himself registered.
Further, certain categories of persons requires to get compulsory registration without any turnover limit.
Any person who is required to get registered under the GST Law whether due to Turnover limit or any other reason and has not registered is required to pay penalty equal to the amount of tax evaded, subject to a minimum limit of Rs.10,000.
Who requires GST registration
Following persons are required to get registered under GST.
- Persons already registered under any previous Indirect tax law such as VAT, Excise Law, Service Tax etc.
- Business whose Turnover exceeds the Prescribed threshold limit of aggregate turnover during a Financial year-
| S.No. | Turnover Limit | Name of the State |
| 1 | Rs.10 Lakh | Manipur, Mizoram, Nagaland and Tripura |
| 2 | Rs.20 Lakh | Arunachal Pradesh, Meghalaya, Sikkim, Uttarakhand, Telangana, Puducherry. |
| 3 | Rs.40 Lakh | All other states than specified above. |
- Person paying tax under Reverse Charge Mechanism. (Goods Transport Agency services)
- Non Resident taxable person
- Casual Taxable Person
- E-Commerce Aggregator (Example – Ola, Uber etc.)
- Person supplying through E-Commerce Aggregators (Example – Restaurants delivering through Swiggy etc.)
- Input service distributor.
- Person supplying online information and database access or retrieval (OIDAR) services from a place outside India to a person in India, other than a registered taxable person.
- Person making any Interstate supply.
- Person who are required to deduct TDS under the GST Law (Example – Government departments)
- Agents of Suppliers of Goods and/or Services.
- Persons supplying goods and/or services, through electroniccommerce operator (other than branded goods/services).
- Every E-Commerce Operator (Example – Amazon, Flipkart etc.)
- Such other person or class of persons as may be notified by the Central Government or a State Government on the recommendations of the Council.
Benefits of GST registration
- A Registered Person has legal recognition as supplier of goods and/or services.
- Only a registered person can claim Input Tax Credit (ITC) on goods purchased and services taken. The ITC can be utilized for payment of Output tax liability.
- Proper accounting of sales and purchases is done because of maintenance of GST records.
- Only a registered person can issue taxable invoice for goods and/or services supplied.
Read More: GST advantages for startups and small businesses
GST registration process
How to get registration under GST? OR what is the Process of GST Registration? OR How can I register with GST? all questions answer is below
For a Normal Taxpayer/ Composition/ Casual Taxable Person/ Input Service Distributor (ISD)/ SEZ Developer/ SEZ Unit, the registration application is same.
The Registration for GST is done online through GST Portal. Following are the steps to get GST Registration :-
- Go to the URL, https://www.gst.gov.in/ and the GST home page is displayed.
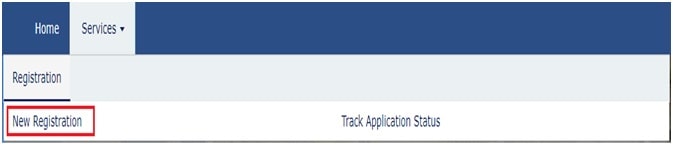
- Click Services > Registration > New Registration option.

- The Application has two parts A and B.
- After selecting “New Registration” option, Part A appears on the screen.
- In “I am a” drop down list select Taxpayer.
- Select the State/Union Territory and districtfrom the drop down where the business is located.
- Enter the Legal Name of Business as mentioned in PAN
- In the Permanent Account Number (PAN) field, enter PAN of your business or PAN of the Proprietor.
(Note: PAN is compulsory for GST Registration, without PAN you cannot apply for GST Registration)
- Then enter your Valid Email Address. This Email should be accessible by the person applying for registration.
- Then enter your Valid Mobile Number. This mobile number should be active and in use by the person applying for registration
(Note: Two different One Time Password (OTP) will be sent on your Email and mobile number that you provided.)
- Enter the Captcha code from the given image on the screen
- Verify your details and click Proceed.

Note: After clicking Proceed, the GST Portal displays all other GST Numbers and requests belonging to the same person applying for registration (if a person having multiple registration in different states or for different business, the same appears on the screen)
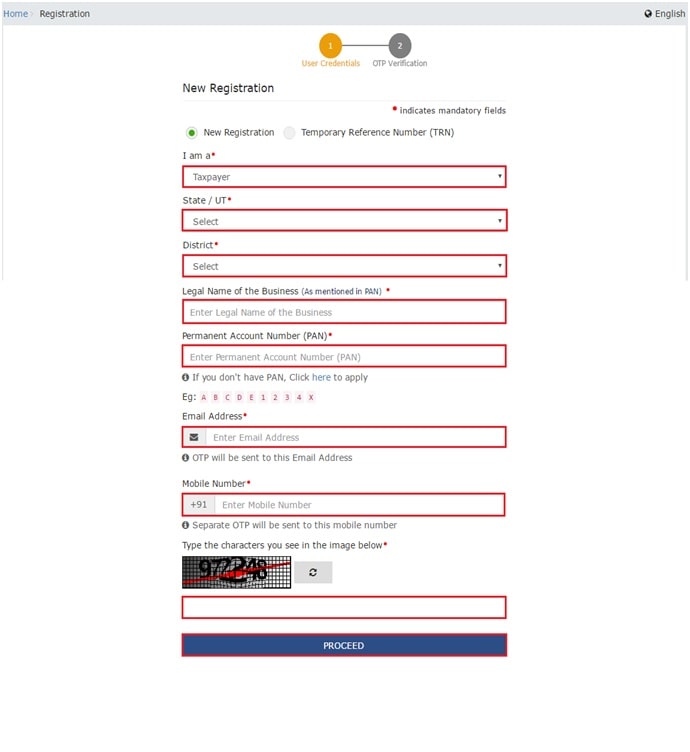
- After clicking on Proceed, The OTP verification page is displayed.
- In the Mobile OTP field, you have to enter the OTP that you received the mobile number you provided in Part A.
- In the Email OTP field, you have to enter the OTP you received on the email address you provided in Part A.
(Note: Both OTP is valid only for 10 minutes.)
- In case OTP you entered is invalid, click on Click here to resend the OTP link and try again. You will receive the OTP on your registered mobile number or email ID again, enter the OTPs and try again.
- Then Click the Proceed button to move forward.

- The System will generate a Temporary Reference Number (TRN) on successful verification of PAN and Email and Mobile OTPs. TRN is displayed on the screen.
- TRN acknowledgment information will be sent on your e-mail address as well as your mobile number.
- Using this TRN you can access the application form from My Saved Application submitted on GST Portal. Part B of the Application needs to be completed within 15 days of TRN generation.
- Once you Enter TRN and Captcha, OTP screen is displayed, after entering OTP received on Mobile/Email, Click Proceed, then My Saved Application page is displayed, click the Edit icon, in the Action column.
- The Registration Application form with various tabs is displayed. There are ten tabs as Business Details, Promoter/ Partners, Authorized Signatory, Authorized Representative, Principal Place of Business, Additional Places of Business, Goods and Services, State Specific Information, Aadhaar Authentication and Verification. You have to enter details in each tab.

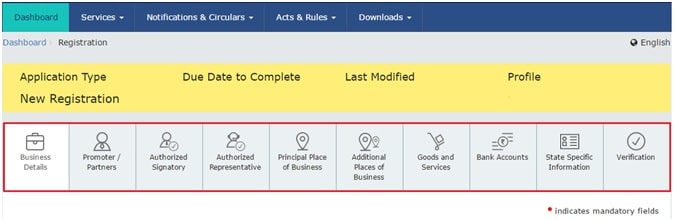
Business details tab
In this field you have to enter Trade name, Constitution of Business (say Partnership), District and Sector/ Circle / Ward / Charge/ Unit, Commissionerate Code, Division Code and Range Code.
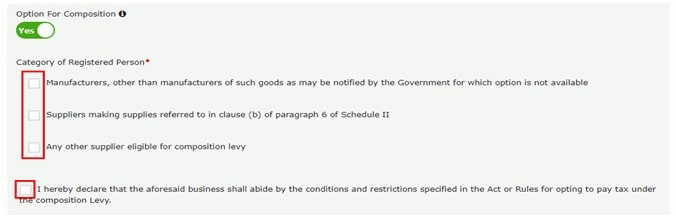
Further in the Option for Composition field, select “Yes” in case you want to opt for the Composition Scheme, or else select No. then select the Category of Registered Person under the Composition scheme.

Next you have to select a Date using the given Calendar for the Date of commencement of Business and the Date on which liability to register arises.
In Case you are a Casual taxable Person, select “Yes” in respective field otherwise select “No”.
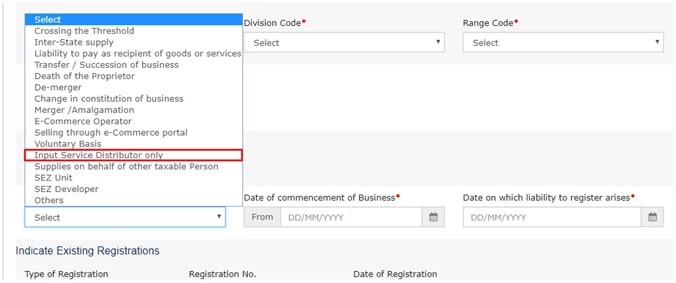
Then you have to enter the reason for Registration from the drop down list.

In Case of Registration as a SEZ Unit or Developer, further information regarding SEZ is to be given.
- Click the SAVE & CONTINUE button after filling all the Information.
- A blue tick appears on the Business Details section indicating the completion of the tab information and the Profile indicates the percentage completion of the application form.
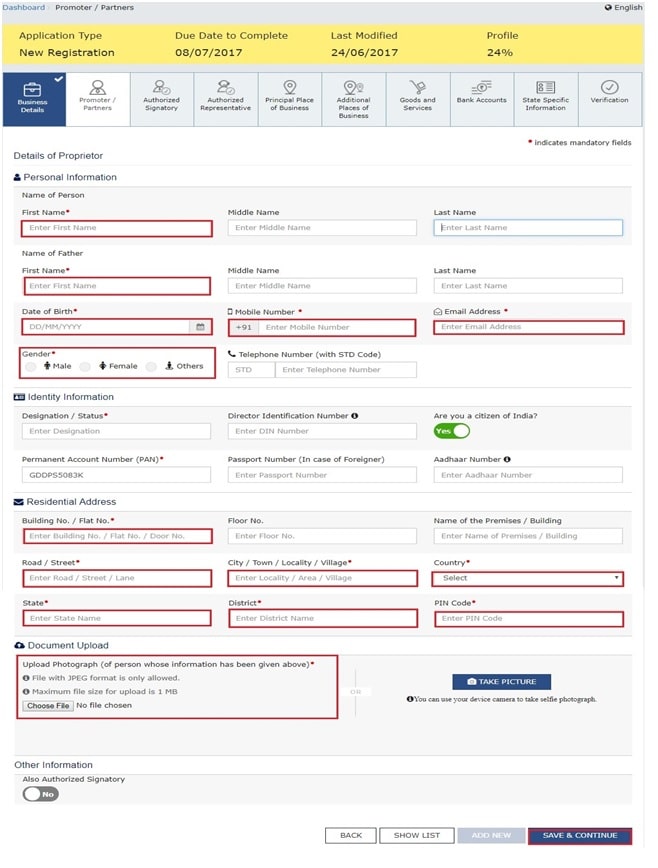
Promoter/Partners Tab
- In this tab enter the details of the stakeholders chosen in the constitution of business detail. You can enter details of up to 10 Promoters or Partners.
- Enter the Personal information (name, DOB, address, mobile number, email), Identity Information (Designation, DIN), Residential Address of the Promoter/Partner.
- In the Document Upload section, click the Choose file button. Navigate and upload the photograph of the stakeholder (It can be PDF or JPEG file of size 1 MB)
- Click SAVE & CONTINUEafter verifying the details to move forward.

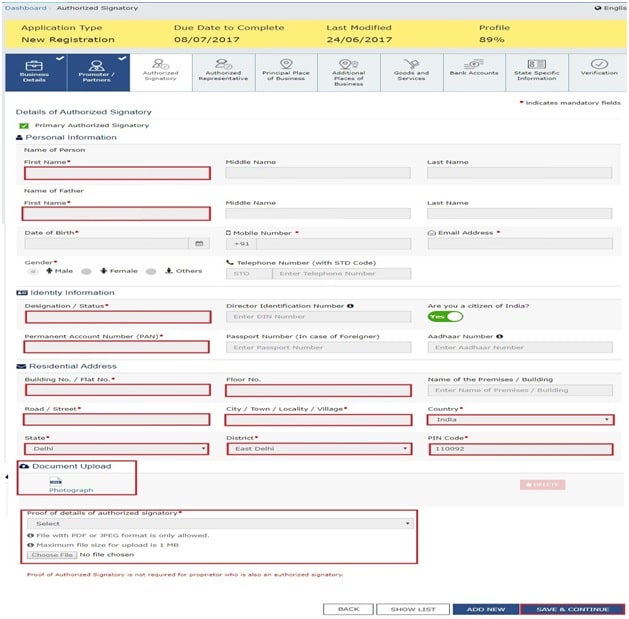
Authorized Signatory Tab
- Here you can enter the details of up to 10 authorized signatories.
- Select the checkbox for Primary Authorized Signatory, if you are the Primary Authorized Signatory.
- Enter the Personal Information. Identity Information and DIN (in case of director of company)
- Enter PAN and Aadhaar Number.
- Then Click SAVE & CONTINUEButton to Proceed.

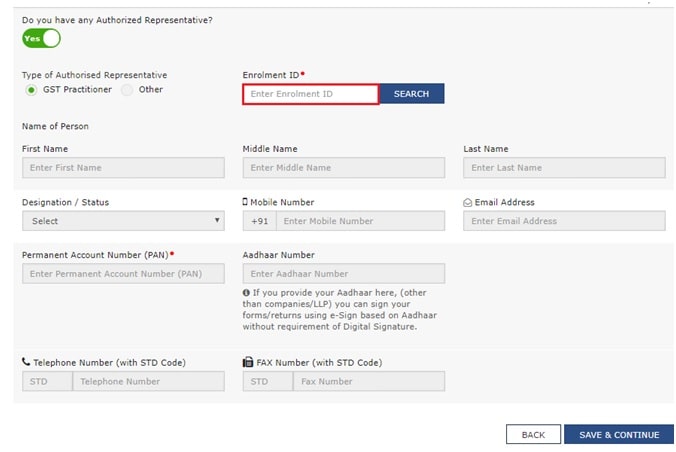
Authorized Representative Tab
- In case you a have a GST Practitioner or any other person as your authorized representative, you have to mention their details here.
- For the GST Practitioner, enter his enrolment number and click search, his information will get auto filled on the GST Portal.
- In case of any other person, enter the Personal information of such person
- Click SAVE & CONTINUEto Proceed further.

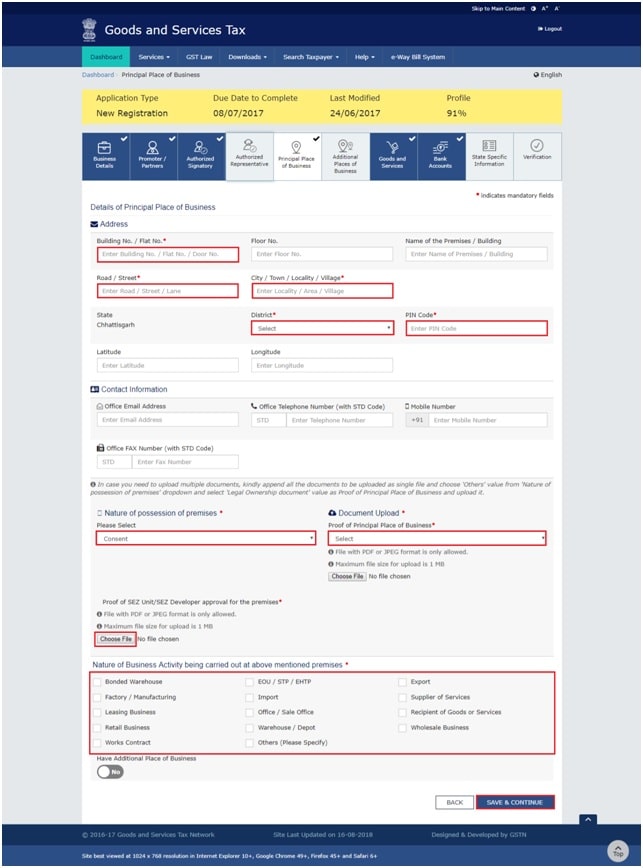
Principal Place of Business tab
- Principal Place of Business is the primary location within the State where a taxpayer’s business is performed. The principal place of business is generally the address where the business’s books of accounts and records are kept and is often where the head of the firm or at least top management is located.
- Here Enter the State, District from the drop down and enter corresponding PIN.
- Enter the Contact information (Mobile Number, Email Address)
- Select the nature of possession of premises from the drop down list.
- In the Document upload section, upload the address proof for the Place of Business as stated above.
- You can upload following documents as proof for the Place of Businnes
- For Own Premises – Latest Property Tax Receipt or Municipal Khata copy or copy of Electricity Bill
- For Renter Premises – Rent / Lease Agreement with any document in support of the ownership of the premises of the Lessor.
- Select the checkbox for Nature of Business activities being carried out at above mentioned premises.
- In case you have additional place of business, select Yes for Have Additional Place of Business.
- Click the SAVE & CONTINUE button to proceed.

Additional Places of Business tab
- In case you have any place(s) other than the Principal place of Business, mention the number of such places and add the details of such place(s). Similar details are to be filled as mentioned in Principal place of business
- Click SAVE & CONTINUE to proceed
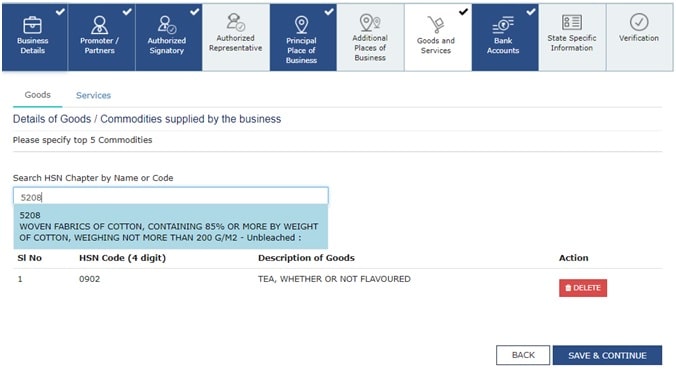
Goods and Service Tab
- Here you have to give the details of Goods supplied or service provided by you
- In case of Goods, mention the HSN code of such goods
- In case of Services, mention the classification code
- You can add a Maximum of 5 Goods and 5 Services, if there is more, add the top/main 5 goods and/or services.
- HSN code can be searched for by name or code field.
- Click the SAVE & CONTINUE Button to Proceed.

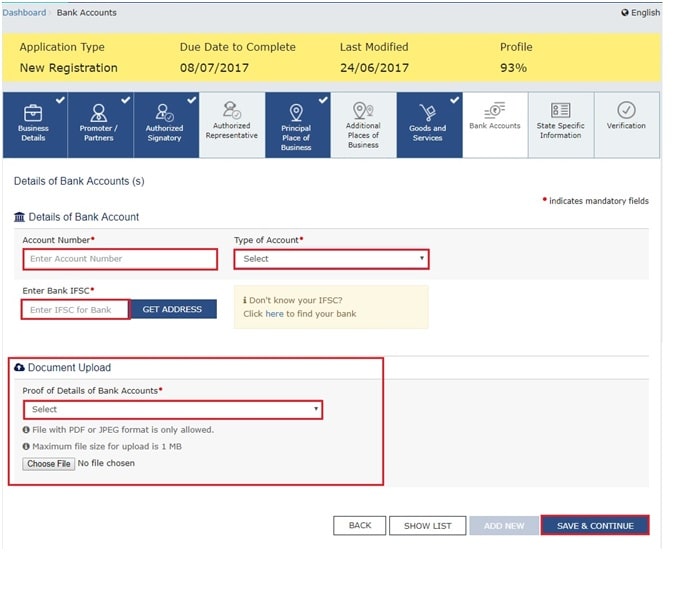
Bank Accounts Tab
- Here you have to enter the details of bank accounts maintained for conducting business. You can enter the details of upto 10 bank accounts.
- You have to enter the Account number. Account type (Saving, current), IFSC code of the Bank.
- In the Document upload section. Upload a scanned copy of Passbook or bank statement.
- Click SAVE & CONTINUE button to Proceed further.

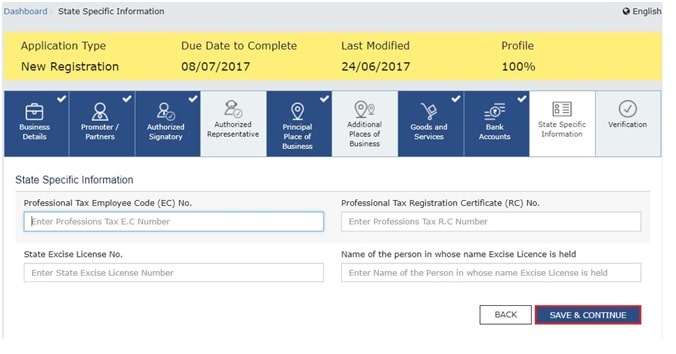
State Specific Information tab
- Here you have to mention state specific details regarding your business like Professional tax employee code, Registration certificate, state excise license number etc.
- Click SAVE & CONTINUE button to Proceed further.

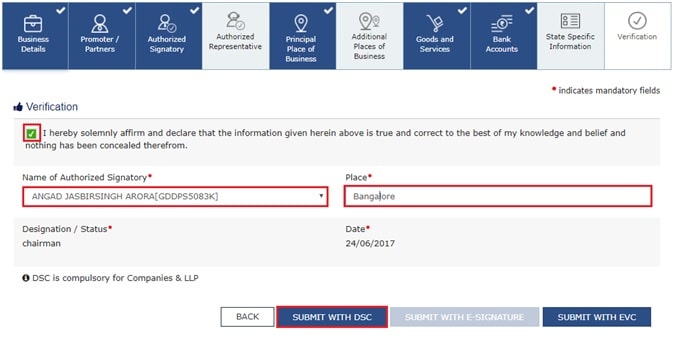
Verification tab
- Here you have to verify the details of Promoter/Partners, Authorized signatories using the Aadhaar Verification link
- Select the name of Authorized signatory and place where form is filled
- The Application form needs to be digitally signed either by using
- Digital Signature certificate
- E-Signature using Aadhaar (only if Aadhaar details provided earlier)
- DSC is Compulsory for Companies and LLP.
- Click the Submit with DSC button.
- Then Click the YES button for confirmation of DSC.
- Select the certificate and click the SIGN button.

By following the above steps and filling in all the necessary information, the success message is displayed.
You will receive the acknowledgement in next 15 minutes on your registered e-mail address and mobile phone number.
Application Reference Number (ARN) receipt is sent on your e-mail address and mobile phone number.
The status of your application can be tracked using the Services > Registration > Track Application Status command.


The application can also be submitted through E-Signature using Aadhaar verification link in the same way after entering OTP received on registered mobile number.
Documents required for GST registration process
- PAN
- Aadhaar Card
- Address Proof for the Place of Business or nay additional place of Business
- Registration/Incorporation certificate.
- Identity Proof of Promoters/Partners/Directors with Photograph.
- Bank Account Proof like Bank statement or passbook scanned copy
- Digital Signature Certificate.
GST registration certificate
The GST Registration Certificate is available for download only on the GST Portal.
Once you have successfully submitted the GST Registration application form, a GST Registration certificate is generated on Portal and you will be granted a GSTIN (Goods and Service Tax Identification Number).
The Registration Certificate is in Form GST REG-06. There is no physical copy of Certificate issued by Government, it is only for online download from GST portal.
Cancellation of GST registration
Any person who has been allotted a GSTIN earlier can apply for Cancellation by filling the Application in FORM GST REG-16.
To file for cancellation of GST registration, please perform the following steps:
Go to https://www.gst.gov.in.
Login to the GST Portal using your user-ID and password. Select Services > Registration > Application for Cancellation of Registration option.
- The Cancellation of Registration can be done on account of following reasons:
- Change in PAN due to change in constitution of Business (say conversion of Partnership into Private Company)
- Ceased to be liable to pay tax.
- Closing down of business
- Transfer of Business due to amalgamation/merger/sale etc.
- Death of Sole proprietor
- Other reason (specify)
- Cancellation details to be provided like Date of cancellation, last return filled, last tax payment details etc.
- Verification to be made using DSC or E-signature.
Thus by following above steps one can apply for cancellation of GST registration.
Read More:
GST Return Filing: Step by Step Guide
All You Need To Know About Tax Payments under GST
Important links
GST Portal – https://www.gst.gov.in/
GST Registration – https://reg.gst.gov.in/registration/
GST Login – https://services.gst.gov.in/services/login
GST Application Status – https://services.gst.gov.in/services/arnstatus
GST Frequently Asked Questions (FAQs)
To apply for GST online registration one can go to GST Portal and click new registration in the Services Tab.
GSTIN stands for Goods and Service Tax Identification Number. GSTIN is allotted to a tax payer after successful submission of registration application
There is no cost for applying for GST Registration. The government of India does not charge any fee for registration for GST.
The status of Registration can be checked using ARN received at the time of submitting the application. It can be done using the link https://services.gst.gov.in/services/arnstatus
To download GST registration certificate Go to GST Portal and login, then go to
Services>User Services>View Download/certificate.
The GST registration is PAN and state based and a person can have multiple registration for different business in different states.